
Click on the Read More link for the rest of this post...
This is the 3rd time I was building a DIY spraybooth, hence the title of the post, and I've gone over the basics in the past two designs, which you can find here:
DIY Portable Spraybooth
DIY Compact Spraybooth
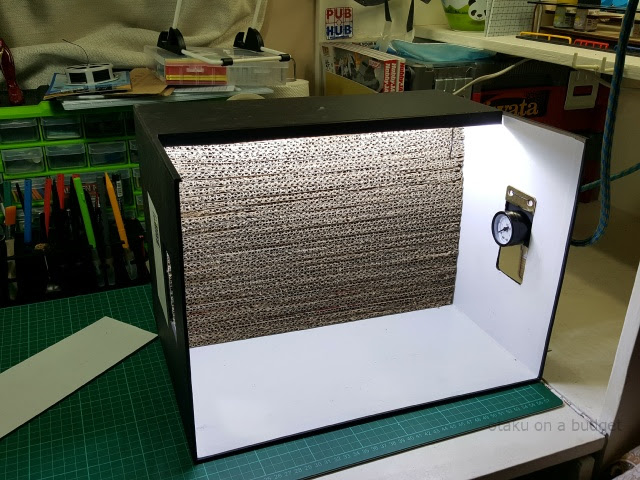
Both have their pros and cons and are suitable for different needs, but this time around I wanted something a bit more in sync with my transforming workbench. I had an empty filing box where I used to keep sprues, and it was the perfect size for the project. These thick cardboard boxes are usually available anywhere office supplies are sold. They're heavier than plastic bins of similar size, but are much easier to cut.
First I had to make a square hole in the bottom of the box, so my old exhaust fan could fit through it. The walls of the box are pretty thick (around 4-5mm) but a box cutter did the job just fine.


Next, I cut off about half of the ceiling so I could maneuver a painting-stick comfortably in front of the booth and not worry about the painted part coming in contact with the top wall. This improves the view a lot because my desk height has the booth sitting lower than eye level, so I'm spraying at a downwards angle rather than straight forward.


I had a bunch of LED lights intended for my display cabinet, but since I had some extra ones I installed some into the booth as well. The lights were attached to the booth's ceiling with double sided mounting tape. They're powered by a 12v adapter which I then wired to the fan's power cord. This way both the lights and the fan are activated by one switch.


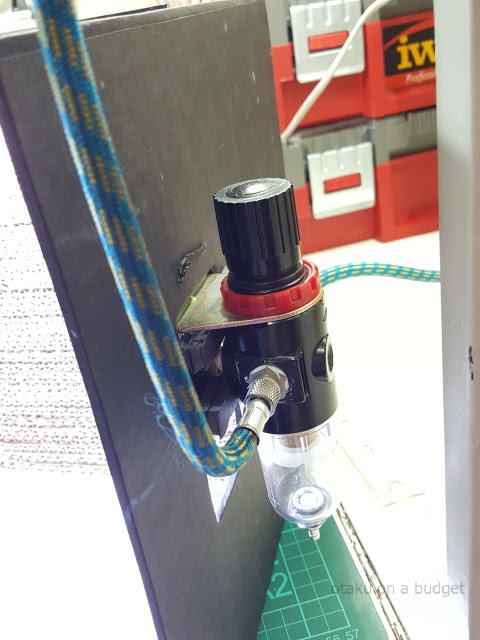
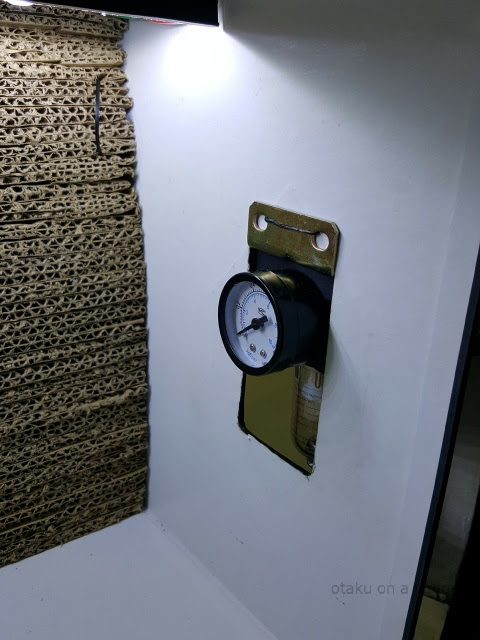
The compressor regulator was mounted to the side of the booth using twisty-ties. The the box's handle holes made a nice window for the gauge to poke through. Now I can adjust the pressure and monitor the condensation in the water trap easily.


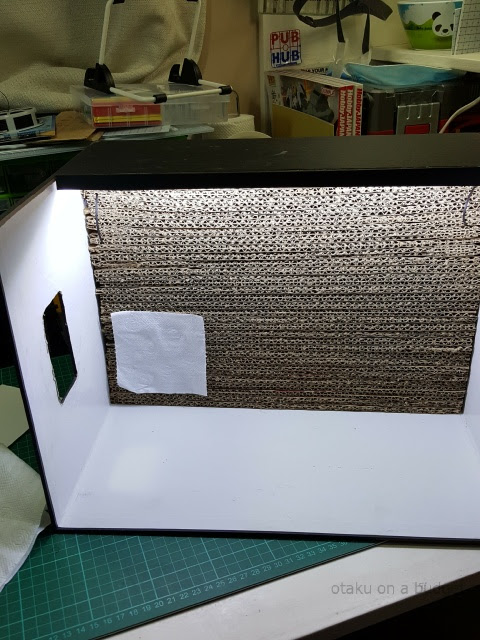
I made a filter using stacked cardboard strips. This was the most time consuming part of the build, but it's a great way to recycle grocery boxes. Since it was designed to be a tight fit, loops of twisty ties were strung through both ends so the filter could be pulled out easily when it needs to be replaced. The filter sits right behind the led lights, about 2 inches from the fan.


With all components in place, I did a quick tissue test to make sure air was being drawn in from all corners of the filter. I plan on adding a bag of activated charcoal or a carbon mat between the fan and the cardboard filter to help control the smell of paint, but other than that I consider this build complete!

The new booth is nearly double the size of my previous setup, has built-in lights, a regulator and water-trap, is able to keep all of my airbrushing chemicals when not in use, and still fits nicely into my work cabinet. I'd say it's a significant upgrade from my old folding design!


Side projects like this are a great way to counter build burnouts and upgrade your hobby gear at the same time! If you have any questions or suggestions for this design, feel free to put them in the comments section below. Until next time, keep building plamo!
The build is simple but the output looks great. i can use this as a reference for my own spray booth build, since the parts are widely available in my locale.
ReplyDeleteglad you like it! feel free to share your own spraybooth build when it's done, here in the comments or on my fb page: facebook.com/budgetotaku
DeleteCan you tell me what sizes of your box' dimensions are? In centimeters if you can. Thanks.
ReplyDeleteI'll measure it when I get home today, but it's this one:
Deletehttps://www.officewarehouse.com.ph/product/4215/
Where did you buy your exhaust fan? I have been searching online and I can't seem to find one. (I am from Paranaque)
ReplyDeleteI got it at Home Depot, plug is not included so I had to purchase one separately and splice myself.
DeleteSimple, sturdy, and cool! Cost efficient and does not eat to much space on my desk. More tutorial(s), tips and tricks in the future!
ReplyDelete